May 30, 2014

Display for Marshmallow Pops

I love making candy covered marshmallows for events.  They are easy to make and look so pretty when they are done.  The only problem is there is never a cute and simple way to display them. 

I have tried using a Styrofoam block to keep them up right or just putting the treats in bags and on a tray for display but they never look the part.  Today while walking in my pantry I saw my mini cupcake stand.  I believe it is a Wilton (R) item, if I am not mistaken.  Anyhow, they are perfect for holding not only the mini cupcakes but any type of candy on a stick.  Just thought I would share.  Here is a picture to prove it! 

May 28, 2014

Etsy 2014 Craft Party: Augusta

I have been very busy lately!

I host a monthly "craft night" in the Augusta area, otherwise known as the Central Savannah Riverside Area or the CSRA for short.  I love meeting with others to create something new.  Every month is a new adventure because I try to pick something new and different to do at every craft night.  This year I have the great pleasure of hosting the Etsy 2014 Craft Party in my area!

So without further a do... the theme is:

 Recapture, Bring new meaning to your photographs.
This year’s theme focuses on transforming photographs into display-worthy works of art using a variety of craft supplies and creative techniques. 

To get some ideas of what we will be doing visit our local craft party page on Pinterest.  

For every craft night, I do a list of things you should bring to get your craft on, lol.


What to bring;
1. Photograph (preferrably black and white, vintage or old family photo that you would like to decorate, paint or embroider, remember you can make copies of your photos or restore your photos at places like Walgreens.com).
2. Embroidery Needles
3. Embroidery Thread or yarn
4. Scissors
5. Tracing Paper (I will bring extra, so no need to worry about this)
6. Possible Embroidery Pattern that you would like to use
5. Paint Markers (if you wish to paint on your picture, rather than embroider on it).
6. Embellishments (Buttons, Sequins, Stickers, Ribbon, Stamps and Ink, Washi Tape, Glitter, etc.)
7.  Glue
8.  Pencil
9. Something Sweet, Salty, or Drink*
 

There will be prizes for the best three photos and possible door prizes!  We will be meeting downstairs in the meeting room of the Columbia County Library. There are only 30 spots so RSVP soon!
*This event is free of charge but we do ask that you bring a snack sweet or salty, drink or a decoration for our venue.  (For most of my craft nights, I ask that people bring a snack if the would like, but this even is earlier in the afternoon, so I am making the snacks a must).  


Lets bring new meaning to our new photos while having a little fun together!

For more information visit the event page.


So excited to be hosting this event!  I hope that you come and craft with us :) 

*All links to the pictures in the header can be found on this Pinterest Board.  

Nov 6, 2013

Tonka Lampshade

At one time I had a spare lamp, with no lamp shade.  I wanted to get rid of it and buy a new lamp because I needed one for a toddlers room.  But I just can't bring myself to throwing anything away!  That is one of my weaknesses, I know!

  Anyhow, I bought a light colored fabric lamp shade with a inner plastic lining and thought of ways to decorate it.  I found a Tonka coloring book and used the pictures as the templates for a "construction site" on my lamp shade.  To get the outline of the trucks on the lamp, I cut out the pages I wanted to use, and taped them on the inside of the lamp.  I then put the shade on the lamp and turned it on.  It was an instant light box.  I was able to trace the Tonka truck and car pictures that I wanted to use with a pencil.  The empty spaces where filled with a roadway that went around the lampshade, street signs and trees.  After tracing and drawing some pictures, I colored them in using both acrylic and Puffy t-shirt paint and a paint brush.  The Puffy Paint gave the wheels a 3-D effect and acrylic paint helped with the effect of a dirt mound.  On the right, you can see the pictures of the work in progress.  

Materials:
1.  Toddler coloring book-use pictures with little detail or it will be harder to trace. 
2. Pencil
3. Light colored fabric lamp shade
4. Lamp with bulb
5. Paintbrushes
6. Paint (Puffy Paint and/or Acrylic)


There are many sites online where you can print free coloring book pages.  I even found some of the ones I used here.  If you make something like this, I would love to see how it turned out.  This lamp has been in use for over two years and still looks good!
   

Oct 21, 2013

Fall Yarn Wreath

  Last year, yarn wrapped wreaths were the "in thing".  Thankfully, this year they are still in style!  I have seen many pretty ones, even ones with felt flowers.  I decided I would try my hand at it.  I love to crochet, so I have my secret stash of yarn and found an orange skein that reminded me of fall. 

Materials;
12" foam wreath round
1 skein of yarn (I used Red Heart Soft, Tangerine)
Scissors
2 Flat head or satin pins
Hot glue gun and glue sticks
Wired 2" wide ribbon (I used a fall glittered leaf one I had). 
Embellishments: 
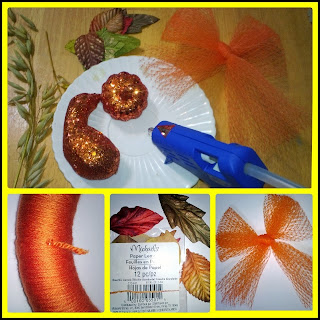
  I used glittery gourds and pumpkins, some dried oat sprigs, paper fall leaves (both at Michaels in a pack for less than a dollar) and a bow made out of an onion orange mesh bag. 

Before I begin explaining how I did it, I should explain that the most tedious part of this craft is to wrap the yarn around the foam round.  It took me two afternoons, while I watched some TV.  You also have to keep your yarn together, because it can easily get tangled.  Tangles will only make your wrapping take longer! I was determined so I didn't get too frustrated. 

I first took a flat pin and pinned my yarn down to my wreath, leaving a one inch slack.  Then I began to wrap, making sure that the string was fairly taught and there were no spaces showing in the inner part of my wreath.  I say the inner circle because inevitably there will be some parts on the outer part of your foam wreath that will show.  Don't worry, that will get taken care of when you wrap yarn around the wreath a second time.  Some say to wrap three times, but I found that two times was enough, if you make sure when you wrap you keep it tight and close together.  When I was done, doing my first round, I started overlapping over the yarn for a second layer.  This time I made sure that the foam parts on the outer part of the wreath which were showing were being covered by the yarn.  When I returned to the starting point, I used another flat pin to pin my yarn down and left another inch for good measure.  This spot would be covered by the ribbon later.

So you have your wreath round wrapped; now you have to embellish.  I try to use what I have on hand, so I conjured some oat sprigs from last year and some leaves that I had used for scrapbooking the year before.  I started to position my items, to get an idea of how I wanted things.  This is important to do before gluing it down.  The I found some glittery foam pumpkins and gourds I had, and my design was complete.  I used my glue gun to glue those off center, to the left (remember the top of your wreath should be where your flat pins are!).

  The last step is to make the door hanger.  I first cut the long ribbon, the length that I wanted for my door, about two feet, so four feet total). An then made a bow with more ribbon and glued it together at the top.  I then made a bow out of my onion mesh bag and glued that on top of the prior bow and finally glued on my glittery gourd.  On the back I used a piece of metal wire to hang my wreath. 

  All in all, it took a couple hours to wrap and less than half hour to embellish my wreath.  I used items I had, so it was fairly inexpensive too!  Hope this  helps anyone that would like to try to make their own, you will be amazed at how wonderful it looks when it is done!
ECC Jay 

Oct 14, 2013

Ribbon Wrapped Flip Flops

       I couple months back I found some flip flops in a clearance bin at Michaels for less than $2.  I got everyone in my house a pair, but when I was looking for my two year old daughter I could only find navy blue ones in her size.  I thought to myself; "I'll get them anyway, I can  make them girly somehow!".  Here is what I came up with;

    I used some ribbon I had on hand (Martha Stewart, woven ombre), six yards total, about three yards per small flip-flop, scissors and hot glue. 


I put a dot of glue on the inside part of the strap and started there.  I began wrapping on one side and worked my way around making sure I was overlapping the ribbon, so the plastic strap would not show. When I got to the middle, I stopped to wrap the prong that goes between the toes.  I had to wrap it twice, once on the way down and on the way back up to the other side of the strap.  With the bit of ribbon that I had left over, I made a tiny bow for each flip-flop which I glued on with a dab of hot glue.  Very simple, but cute.  My daughter sure liked them!
   

Quilled Monogram


   If you have ever wanted to try your luck at crafting, I would say that quilling may be a good place to start.  Materials are inexpensive, you can be as simple or as elaborate as you'd like and the most crucial decision you make is where you want to put the pretty little quills you make. 
 Quilling is the art of twirling and folding  paper to make three-dimensional artwork.  One of the best quilling artist I know of is Christine Donohue.  Her work is impressive and Into Craft did an article about her work, which you can see here.
 I hope you enjoy making your own!

  Materials:
1. Aleene's Tacky Glue
2. Quilling Paper Strips
3. Tweezers (Fine Point if you have them, I used a pair of beading tweezers).
4. Scissors
5. Quilling Tool
6. Wooden Letter
7. Quilling Guide (a printed out paper that can be your visual help and inspiration, here is one from WEDREAM ). 

Most of my materials were bought at Hobby Lobby, not sure if other stores carry them (I did not check, sorry).  Some tutorials claim that you can use hot glue, but I tried this and the glue dries before you have time to remember where you were going to put your quill.  The tweezers helped get portions of the paper glued down that I was not able to with my fingers.  I suggest starting out with a small wooden letter, to see if you actually enjoy doing the quills (it does require a bit of patience).  If you choose a small letter, you get to see the end result sooner which is reinforcing too.

To get started, pick your colors of paper and insert one of the corners into the quilling tool and twirl the paper around it.  For tight scrolls you twirl the paper in the tool tight. For loose scrolls you twirl the paper on the tool loosely.  When you are done twirling, remove the paper carefully so it does not rip.  If you are satisfied, figure out where you want it on your letter.

For my wooden letter, I wanted to make flowers and butterflies, so I started making parts to what would be a flower.  First the center, then the petals, all round shapes.  But in quilling you can make different shapes by pinching your quills or folding the paper strips.  Two pinches, one of each side of a scroll will make a leaf looking pattern.  One pinch or fold will make your scroll look like a teardrop. Two teardrops together will make a heart shape, etc. 

When I began making scrolls I started experimenting with the different shapes I could make and the sizes.  The paper comes in one long strip, so I cut it in half, or into fourths to make smaller quills. Slowly I knew, how I would make the different parts of my garden scene.  Once I had everything on my wooden letter how I wanted it, I started gluing.  The tweezers come in really handy.  I would place the scroll using my fingers as close as I could to the place I wanted it and then, I would wiggly it in place with the tweezers.  I was very proud of my design, for it being the first time I quilled!  What do you think?
EEC Jay
   

Sep 8, 2013

DIY Terrarium Tips

    A friend at craft night once mentioned wanting to host a terrarium night.  I knew little about terrariums at the time and when she moved away, I forgot all about them. A couple of months later I was at a town market and saw a booth with many gorgeous terrariums.  I saw fairy gardens and Cinderella's horse and carriage in both open and closed terrariums.  After seeing the beautiful things that could be made, I wanted to host a class.  Luckily the ladies of Simply Marvelous Creations in the Augusta, GA area held what they called "DIY terrarium parties".  I booked one and a month later we were making them!
    Some of the things I learned:
First Terrarium
1.  Moisten the soil before you put it in the terrarium.  A tip given to us was to use a 5 gallon paint bucket and put your soil and water in and turn with your hands until evenly moist.  A good soil to use is soil for violets. Don't use soil that has the round foam balls (they have a name but it escapes me right now!).   
2.  Use rocks that have been washed and use dyes that are colorfast.  Washing them prevents mold and mildew.  Also, dyed rocks, like those used in fish tanks have been colored and may not withstand the humidity.
3.  Make sure leaves are not touching the glass container you are using, the humidity will make them wilt.
4.  If you are making a closed terrarium, make sure that you watch it for the first few weeks.  A little condensation is ok, but if your glass is weeping on the sides you should take of the lid for a couple hours and let some of the water evaporate. 
5. If you are going to decorate your terrarium make sure your decorations are color fast (You may find cute decorations in your craft stores miniature house section).
6. Keep your terrarium out of direct sunlight, indirect sunlight and fluorescent light are good. 
7.  Try not to buy moss, it can be expensive and if you go for a walk near creeks or in  a forest you will find if free. 

In a future post, I will post the steps to making your own terrarium.   I just did not want to forget these very helpful pointers.  I know the ladies at my craft night thoroughly enjoyed making them and I hope this sparks your curiosity too!